Creating Bee Pasture: Seeds and Planting Plans
Creating bee pasture the right way: site analysis, seed mixtures, flower strips, planting plans, and funding programs for a bee-friendly landscape.
Creating your own bee pasture is one of the most effective measures for your colonies. In this lesson, you will learn step by step how to plan, establish, and maintain a bee pasture.
Step 1: Site Analysis
Before buying seeds, you need to understand your site. The choice of the right plants depends significantly on site conditions.
Determining Soil Properties
- 1
Determine soil type (finger test)
Take a handful of moist soil and try to roll it into a sausage shape. Sandy soil: Cannot be shaped, trickles through your fingers. Loamy soil: Shapes well, is pliable. Clay soil: Very sticky, shiny, hard to work. Optimal for bee pasture: Loamy to sandy-loam soil with good drainage.
- 2
Test pH value
Use a pH test kit from a garden center (5-10 EUR). Most bee pasture plants prefer a pH of 6.0-7.5 (slightly acidic to neutral). On very acidic soils (below 5.5), clover grows poorly; on very calcareous soils (above 7.5), some wildflowers have problems.
- 3
Check light conditions
Most bee pasture plants need full sun (at least 6 hours of direct sunlight). Semi-shaded locations (4-6 hours) are possible but the range of species is limited. Fully shaded locations are not suitable for bee pasture.
- 4
Assess water conditions
Is the site rather dry, moist, or waterlogged? Dry sites: Viper's bugloss, sage, thyme, knapweed thrive here. Moist sites: Purple loosestrife, meadowsweet, comfrey, marsh marigold. Waterlogged sites: Not ideal -- improve drainage or choose adapted species.
Step 2: Choosing the Right Seed Mixture
Not every "bee pasture mixture" from the hardware store or discount retailer delivers what it promises. Many cheap mixtures contain predominantly crop plants (phacelia, buckwheat, sunflower) that are annual and disappear the next year, or non-native species that provide little benefit for the local insect fauna. Look for certified regional seed or proven mixtures from specialist suppliers.
Proven Seed Mixtures
The following examples are from Germany, but the principles apply everywhere. Look for equivalent regional seed mixtures certified for your area:
| Mixture | Composition | Suitable For | Approx. Cost |
|---|---|---|---|
| Veitshochheim Bee Pasture (LWG Bavaria) | Approx. 50 species, annual and perennial, optimized for forage calendar | Beekeepers, farmers, municipalities -- the reference mixture in Germany | 8-12 EUR/100 m2 |
| Tuebingen Mix (University of Tuebingen) | 30-40 native wildflower species, scientifically tested | Conservation-oriented beekeepers, ecological projects | 10-15 EUR/100 m2 |
| Perennial bee pasture blends | 40+ species, emphasis on perennial wildflowers and forbs | Permanent areas, gardens, public green spaces | 12-18 EUR/100 m2 |
| Annual quick mix (e.g., phacelia-buckwheat-sunflower) | 3-5 annual crop plants, rapid bloom | Cover crop, quick greening, bridge forage | 3-5 EUR/100 m2 |
| Regional wildflower seed (certified origin) | Wildflowers collected from regional sources, certified standard | Conservation areas, offset measures, premium | 15-30 EUR/100 m2 |
The best bee pasture mixtures use seed of certified regional origin. In Germany, the Veitshochheim mixtures developed at the Bavarian State Institute for Viticulture and Horticulture (LWG) are considered the best-researched. Similar research-backed mixtures exist in other countries. The key principle: choose native species adapted to your local climate and soil conditions. Many countries have certification schemes for regional wildflower seed.
Annual vs. Perennial
| Property | Annual Mixture | Perennial Mixture |
|---|---|---|
| Bloom start | Fast (6-10 weeks after sowing) | Slow (many species only bloom in the 2nd year) |
| Bloom duration per season | Long (6-14 weeks continuous) | Staggered throughout the entire season |
| Lifespan | 1 season -- must be re-sown every year | 3-7 years (with adapted maintenance) |
| Workload | High (annual re-sowing) | Low after establishment (1-2x mowing per year) |
| Species diversity | Low (5-10 species) | High (30-50+ species possible) |
| Long-term costs | High (annual seed costs) | Low (one-time investment) |
| Ecological value | Moderate (often crop plants) | High (habitat for many insect species) |
| Ideal for | Cover crops, quick greening, fallow land | Permanent areas, gardens, field margins, conservation |
The best strategy is often a combination: Annual quick mix for immediate effect (in the first year) + perennial wildflower mix for long-term impact. Many professional mixtures already combine annual and perennial species, so the area blooms in the first year through annuals and from the second year is taken over by perennials and wildflowers.
Step 3: Establishing the Bee Pasture
- Seed mixture (quantity per manufacturer specification, usually 2-5 g/m2)
- Garden rake or cultivator
- Roller or board for pressing
- Spreading sand for mixing (10:1 sand:seed for even distribution)
- Optional: mulch fleece for difficult sites
Timing: Spring sowing (March-May) or autumn sowing (August-September). Autumn sowing is often better for perennial mixtures, as many wildflowers are cold germinators.
1. Prepare the soil (decisive for success!)
- Remove existing vegetation: break up grassland or rotary till shallowly (15-20 cm deep)
- Carefully remove perennial weeds (couch grass, thistle, bindweed)
- Important: Let soil rest 2-4 weeks, then shallowly work again to remove germinating weeds (false seedbed technique)
- Prepare soil to a fine crumb (rake or seedbed combination)
2. Perform sowing
- Mix seed with sand (ratio 1:10) for even distribution
- Broadcast sow: half in lengthwise direction, other half crosswise
- Seeding rate: Usually 2-5 g/m2 (follow manufacturer specification -- less is often more!)
- Light germinators: Most wildflowers are light germinators and must NOT be covered with soil
3. Press down (very important!)
- Press seed firmly against the soil with a roller, board, or by walking on it
- Soil contact is decisive for germination -- loose application leads to failure
4. Watering (in the first 4-6 weeks)
- Water regularly during drought (morning or evening, not in midday heat)
- Keep soil moist but not wet
- After establishment, watering is normally no longer needed
Step 4: Maintaining the Bee Pasture
First Year Care
- 1
Cleansing cut (8-10 weeks after sowing)
When the area is 20-30 cm tall and weeds (goosefoot, fat hen, millet) overtop the bee pasture plants, perform a cleansing cut at 10-15 cm height. Remove the cuttings! This gives the slow-growing wildflowers light and space.
- 2
Do not fertilize!
Wildflower mixtures thrive better on lean soils. Fertilization promotes grasses and weeds that displace wildflowers. No nitrogen fertilization! If necessary, even impoverish the soil (work in sand, always remove mowing material).
- 3
Be patient
Many perennial wildflowers only bloom in the second or third year. In the first year, fast-growing annuals dominate (poppy, cornflower, phacelia). This is normal and not a sign of failure.
Ongoing Maintenance (from year 2)
| Measure | Timing | Frequency | Important Details |
|---|---|---|---|
| Mowing (1st cut) | Late June / early July | 1x per year | Cut to 8-10 cm height, let cuttings dry 2-3 days (seed drop!), then remove |
| Mowing (2nd cut, optional) | September / October | As needed | Only if the area becomes too grass-heavy; otherwise leave standing (winter habitat for insects!) |
| Rotational mowing | Distributed over the season | Recommended! | Never mow the entire area at once -- always leave 30-50% standing as refuge |
| Remove cuttings | After each mowing | Always | Prevents nutrient enrichment and promotes flower-rich vegetation |
| Control problem plants | Ongoing | As needed | Dock, thistle, nettle: dig out individually, do not treat the entire area |
Never mow the entire area at the same time! Mow in sections with staggered timing -- this way, blooming and unmowed refuge areas are always preserved.
Flower Strips in Agriculture
Working with Farmers
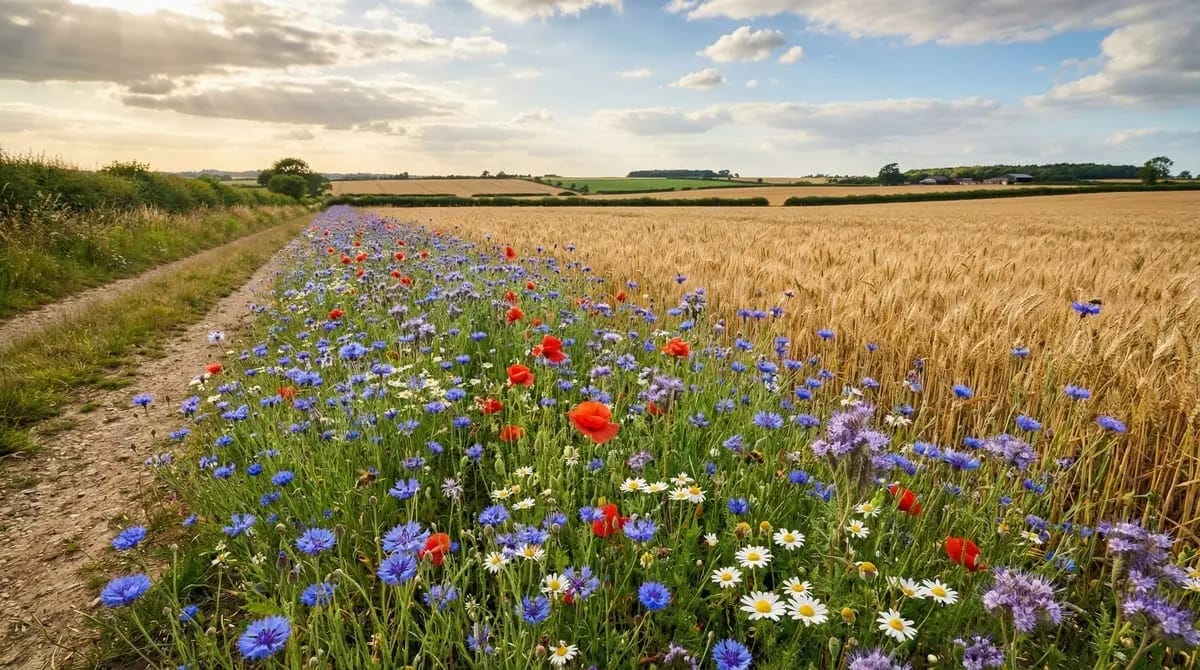
Flower strips on agricultural land are the most effective measure for improving the forage landscape, because they can affect large areas. The key lies in cooperation between beekeepers and farmers.
- 1
Make contact
Actively approach farmers in your area. Many farmers are sensitized to the topic and open to cooperation. Start with a jar of honey as a gift -- it opens doors.
- 2
Plan together
Discuss where flower strips would make sense: field edges, unproductive corners, waterway buffer strips, path edges. Show the benefits for the farmer: promotion of beneficial insects, soil erosion protection, image improvement, subsidy payments.
- 3
Use funding opportunities
In Germany and many EU countries, agri-environmental schemes fund flower strips. Often 500-1,200 EUR/ha/year is paid -- making flower strips economically attractive for farmers. Check your country's agri-environmental programs.
- 4
Provide or recommend seed
Offer to cover or share the seed costs. Recommend proven mixtures suited to your region.
Funding Opportunities and Agri-Environmental Programs
The following examples are from Germany, but similar programs exist across the EU under the Common Agricultural Policy (CAP):
| Program | Region / Organization | Funding Rate | Requirements |
|---|---|---|---|
| KULAP (Cultural Landscape Program) | Bavaria, Germany | 850-1,200 EUR/ha/year | 5-year commitment, certified seed mixtures |
| FAKT (Agri-environment, Climate Protection) | Baden-Wuerttemberg, Germany | 710-1,040 EUR/ha/year | Fallow with prescribed mixtures, 5 years |
| AUM (Agri-environmental Measures) | Various German states | 500-1,000 EUR/ha/year | Varies by state, usually 5-year commitment |
| CAP Conditionality / Eco-schemes | EU-wide | Varies by member state | Voluntary flower areas, non-productive surfaces |
| Eco-schemes (Pillar 1 CAP) | EU-wide | Top-up payments (varies) | Voluntary flower areas beyond mandatory requirements |
Planting Plan: Ensuring Year-Round Supply
The goal of a well-thought-out bee pasture is a seamless bloom offering from February to October. Here is a planting plan covering the most important forage plants throughout the year:
- Feb-MarPre-Spring BloomersCrocus (Crocus sp.), winter aconite (Eranthis hyemalis), snowdrop (Galanthus nivalis), spring snowflake (Leucojum vernum). Plant as bulbs/tubers in autumn.
- Mar-AprSpring BloomersGrape hyacinth (Muscari sp.), squill (Scilla sp.), lungwort (Pulmonaria sp.), primrose (Primula sp.). Plant as perennials or set bulbs.
- May-JunMain Bloom Summer FlowersViper's bugloss (Echium vulgare), meadow sage (Salvia pratensis), knapweed (Centaurea sp.), sainfoin (Onobrychis viciifolia), bird's-foot trefoil (Lotus corniculatus).
- Jul-AugSummer BloomersPhacelia, buckwheat, lavender, hyssop (Hyssopus officinalis), borage (Borago officinalis), wild teasel (Dipsacus fullonum), chicory (Cichorium intybus).
- Sep-OctAutumn BloomersAutumn aster, stonecrop (Sedum sp.), anise hyssop (Agastache foeniculum), goldenrod (Solidago sp.). Promote ivy (do not prune during bloom!).
- Feb-Mar
Pre-Spring Bloomers
Crocus (Crocus sp.), winter aconite (Eranthis hyemalis), snowdrop (Galanthus nivalis), spring snowflake (Leucojum vernum). Plant as bulbs/tubers in autumn.
- Mar-Apr
Spring Bloomers
Grape hyacinth (Muscari sp.), squill (Scilla sp.), lungwort (Pulmonaria sp.), primrose (Primula sp.). Plant as perennials or set bulbs.
- May-Jun
Main Bloom Summer Flowers
Viper's bugloss (Echium vulgare), meadow sage (Salvia pratensis), knapweed (Centaurea sp.), sainfoin (Onobrychis viciifolia), bird's-foot trefoil (Lotus corniculatus).
- Jul-Aug
Summer Bloomers
Phacelia, buckwheat, lavender, hyssop (Hyssopus officinalis), borage (Borago officinalis), wild teasel (Dipsacus fullonum), chicory (Cichorium intybus).
- Sep-Oct
Autumn Bloomers
Autumn aster, stonecrop (Sedum sp.), anise hyssop (Agastache foeniculum), goldenrod (Solidago sp.). Promote ivy (do not prune during bloom!).
Costs and Budget
| Area | Seed (perennial) | Soil Preparation | Maintenance (per year) | Total Cost 5 Years |
|---|---|---|---|---|
| 50 m2 (garden bed) | 5-15 EUR | Own labor | Minimal | 10-20 EUR |
| 200 m2 (large garden bed) | 20-50 EUR | Own labor / rental | 2-3 hrs (mowing) | 30-60 EUR |
| 1,000 m2 (leased field section) | 100-200 EUR | 50-100 EUR (contractor) | 50-80 EUR (mowing) | 400-700 EUR |
| 1 hectare (agricultural) | 800-1,500 EUR | 200-400 EUR | 100-200 EUR | 2,000-3,500 EUR (minus subsidies) |
You do not need to sow a whole hectare right away. Start small -- even a 10 m2 flower bed in the garden or a few pots on the balcony with borage, thyme, and lavender are a beginning. Once you see (and hear -- the buzzing is unmistakable) the effect, motivation for larger projects grows on its own.
Top 10 Bee Pasture Plants for the Garden
| Plant | Bloom Period | Nectar Value | Site |
|---|---|---|---|
| Borage (Borago officinalis) | Jun-Sep | 4 | Sun, nutrient-rich |
| Viper's bugloss (Echium vulgare) | Jun-Aug | 4 | Sun, lean, dry |
| Lavender (Lavandula angustifolia) | Jul-Aug | 3 | Full sun, dry |
| Meadow sage (Salvia pratensis) | May-Jul | 3 | Sun, lean, calcareous |
| Knapweed (Centaurea jacea) | Jun-Sep | 3 | Sun, undemanding |
| Oregano (Origanum vulgare) | Jul-Sep | 3 | Sun, dry |
| Thyme (Thymus sp.) | Jun-Aug | 3 | Full sun, lean |
| Bird's-foot trefoil (Lotus corniculatus) | Jun-Aug | 3 | Sun, lean |
| Stonecrop (Sedum spectabile) | Aug-Oct | 3 | Sun, dry |
| Sneezeweed (Helenium sp.) | Jul-Sep | 2 | Sun, moist-fresh |
Summary
Core Knowledge: Creating Bee Pasture
Knowledge Check
In the next lesson, we turn to the long-term investment: planting trees for bees -- which species make the best forage trees and how a single tree can secure decades of bee forage.